📋 Jump to Section
Introduction
Install the App
Get Your Direct Link
Sign In & Account Setup
Permissions & Apartment
Add Family Members
Invite a Member
Accept & Verify
Visitor Video Calls
Accept Calls
Approve / Reject Entry
Unlock Gate & Allow Access
Add Member During Call
Apartment Calling Apartment
Pre-Approved Guest Access
Pass Types
Residents & Tenants Guide
Get Started with DoorVi
Set up your DoorVi app, link your apartment, and invite family members — all in a few easy steps.
📱 Mobile App
🔐 Easy Sign-In
👨👩👧 Family Access
🔔 Instant Visitor Alerts
Introduction
Welcome to DoorVi — your smart door video intercom
DoorVi lets you receive visitor calls, see who is at the door, and grant or deny entry — all from your smartphone. This guide walks you through installing the app, setting up your account, and adding family members so everyone in your household stays connected.
How to Install and Set Up the DoorVi App
Download, sign in, and link your apartment in a few minutes
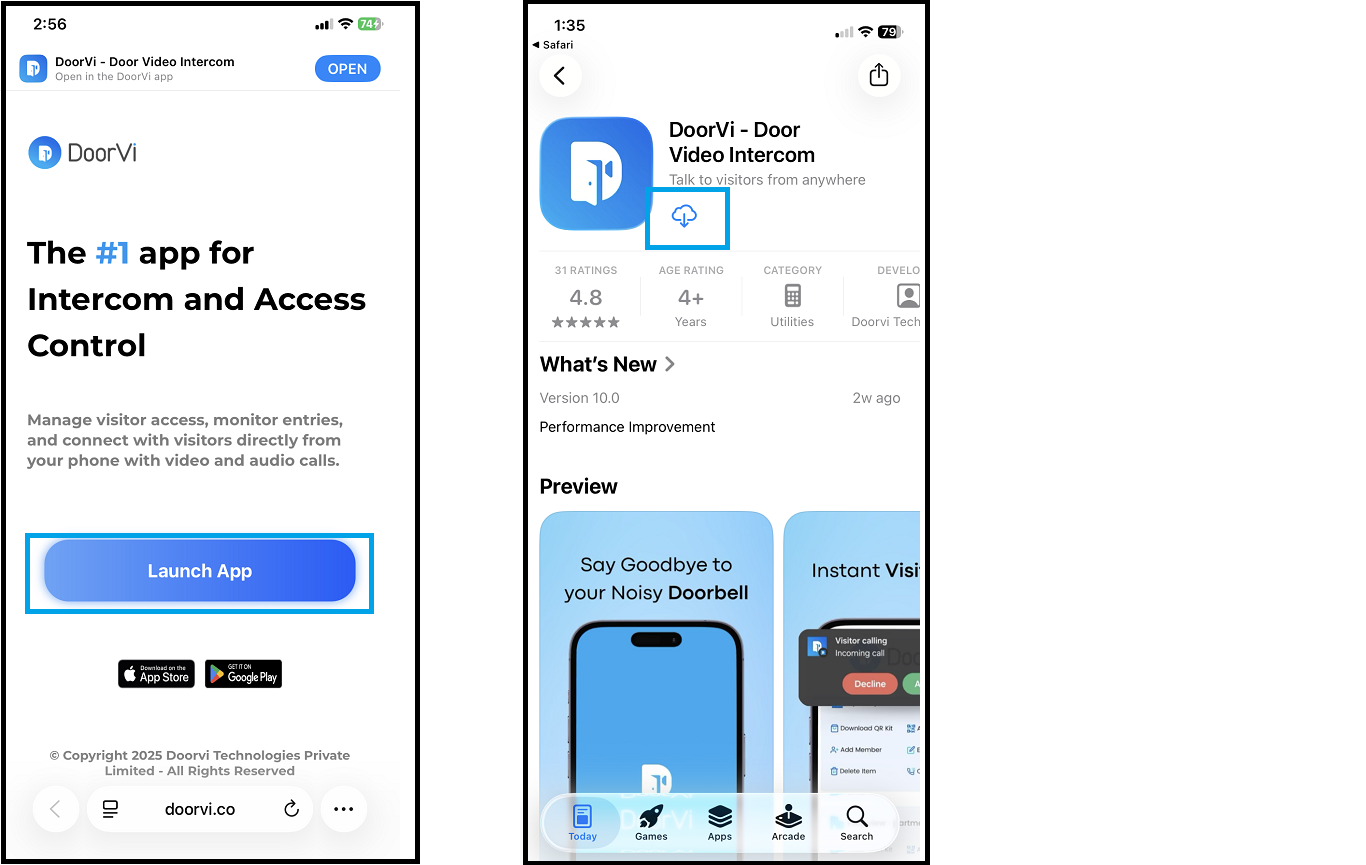
Step 1 — Get Your Direct Link & Download the App
Your property manager will share a personalised install link that opens the App Store directly
1
Ask your property manager or admin for the direct link (e.g.,
https://mobile.doorvi.co?id=XXXX).2
Tap the link — it will open the Google Play Store or Apple App Store automatically.
3
If a permission popup appears, tap Allow or Launch App to proceed.
4
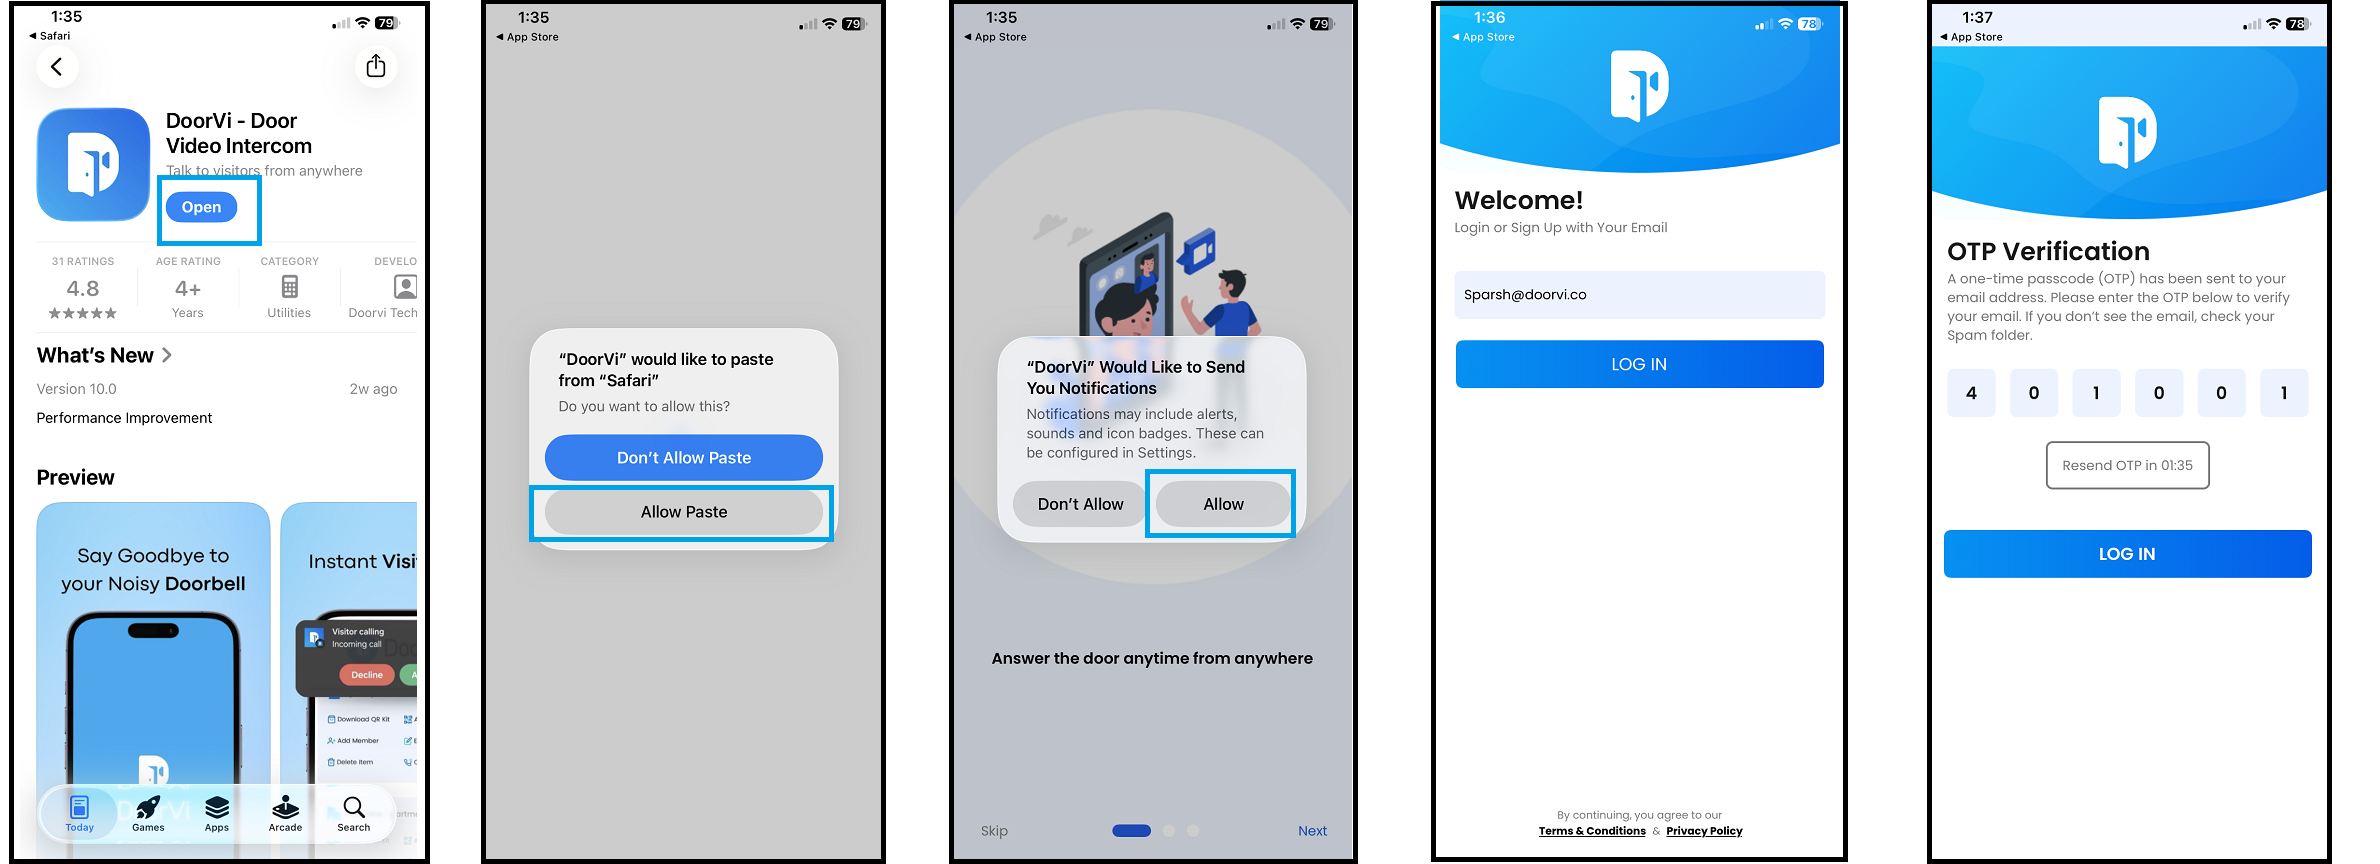
Tap Install on the App Store page to download DoorVi.
Screenshot — App Store Install Screen
Step 2 — Open the App & Sign In
Launch DoorVi and sign in using your preferred method
5
After installing, open the DoorVi app.
Apple devices only: A popup will appear — "DoorVi would like to paste from Safari." Tap Allow Paste to continue.
6
Tap Skip or Next three times through the intro screens, then tap Get Started.
7
On the Sign In screen, log in with your preferred method — Google, Facebook, any email address, or your phone number.
8
If signing in with email or phone number, you will receive a one-time password (OTP). If it doesn't arrive, check your spam or junk folder.
9
Enter the OTP and tap Submit.
Screenshot — Sign In Screen
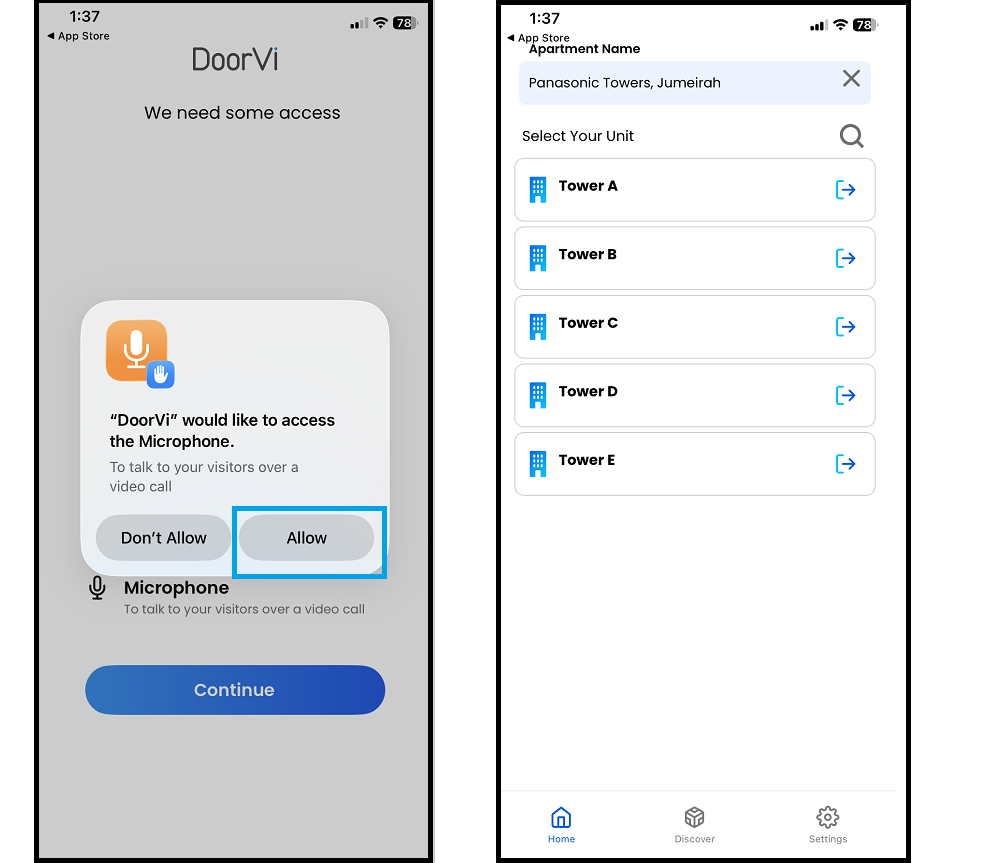
Step 3 — Grant Permissions & Select Your Apartment
Allow app permissions and find your tower and unit
10
After signing in, the app will request permissions (camera, microphone, notifications). Allow all permissions for the full DoorVi experience.
11
The app will display the towers and apartments in your building. Select your tower and apartment number.
Can't find your building? You can add it manually:
Tap Community → select your building type → search for your building name → tap to select it.
Tap Community → select your building type → search for your building name → tap to select it.
Screenshot — Select Apartment Screen
You're all set! Once your apartment is selected, you will receive a call on your phone whenever a visitor rings your doorbell. You can see, speak to, and let in your visitor — all from the app.
How to Add Family Members
Invite others in your household so everyone can receive and respond to visitor calls
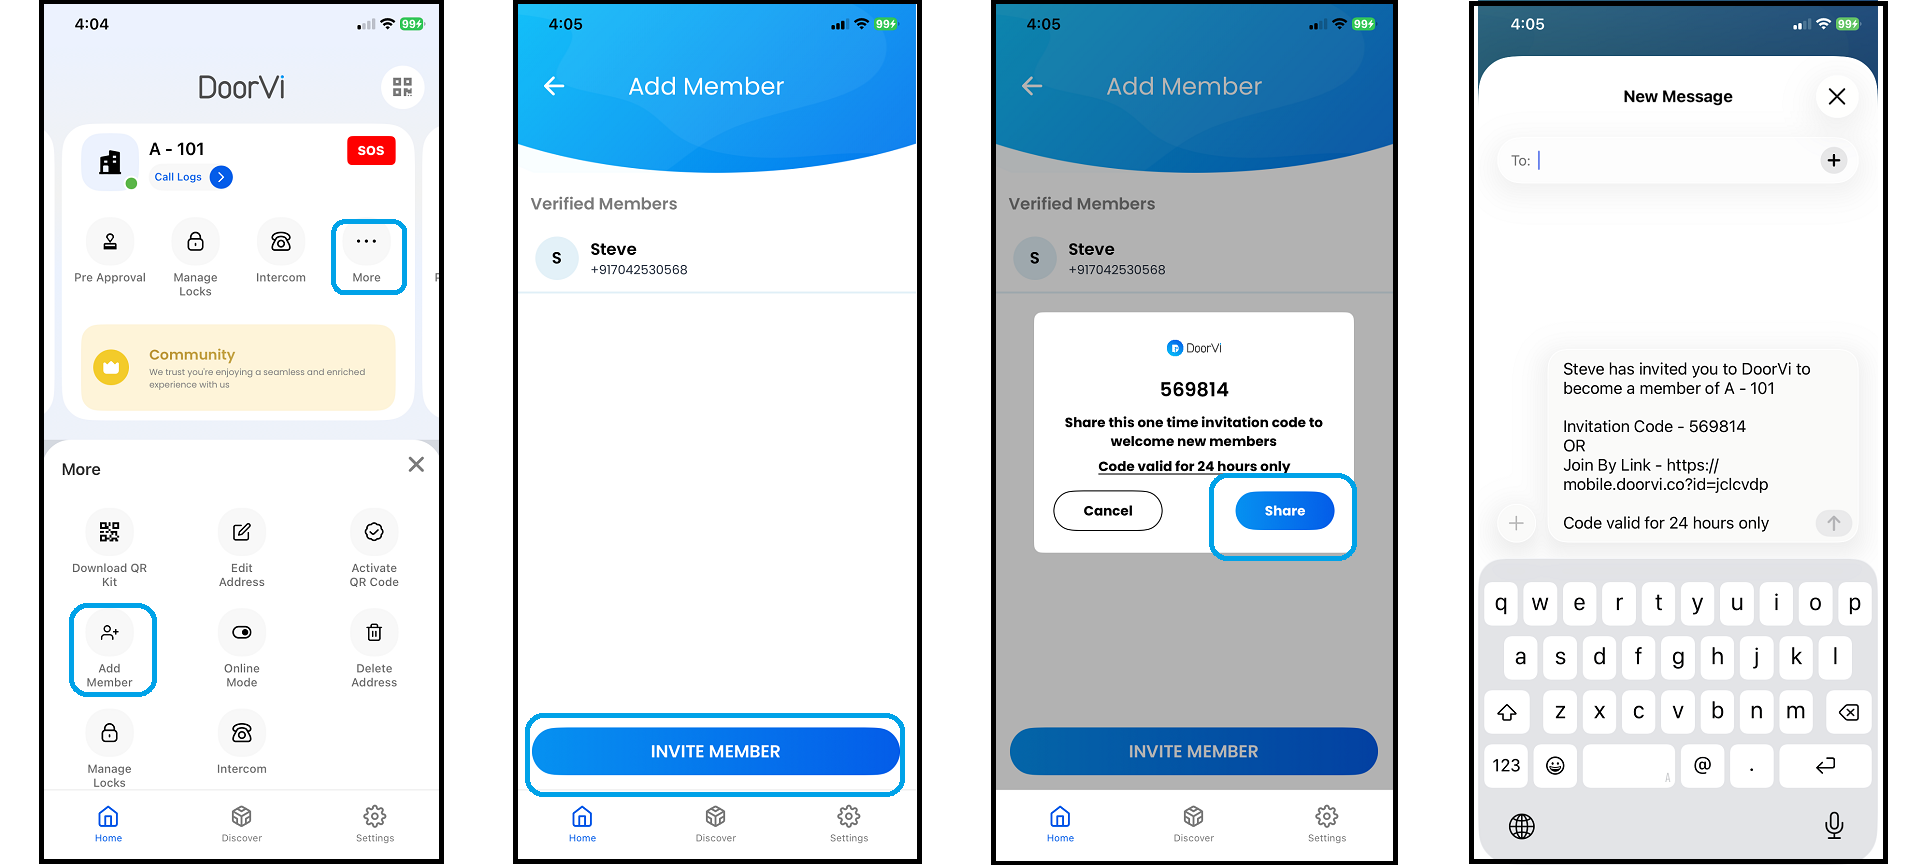
Invite a Family Member
Share a 6-digit invite code from the More menu
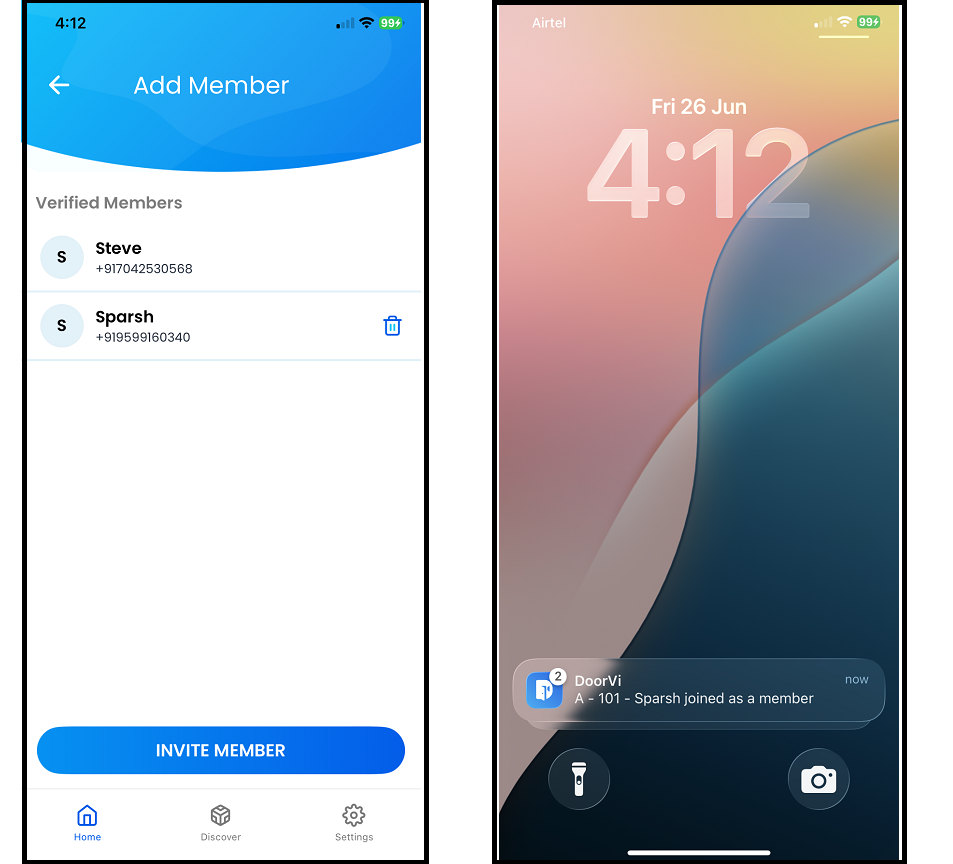
1
On the home screen, tap More on the top card, then tap Add Member.
2
On the Add Member screen, tap Invite Member.
3
A popup will appear with a 6-digit invite code. Tap the Share button.
4
Share the code and link with your family member via WhatsApp, SMS, or any messaging app.
Screenshot — Add Member / Invite Screen
Family Member Accepts the Invite
The invited member installs DoorVi and joins your apartment
5
The invited member should follow Steps 1.2 through 10 from the "Install and Set Up" section above to download the app and sign in.
6
After signing in, the member's app will display your apartment at the same address.
7
You can confirm the member was added successfully by checking the Add Member screen under More.
8
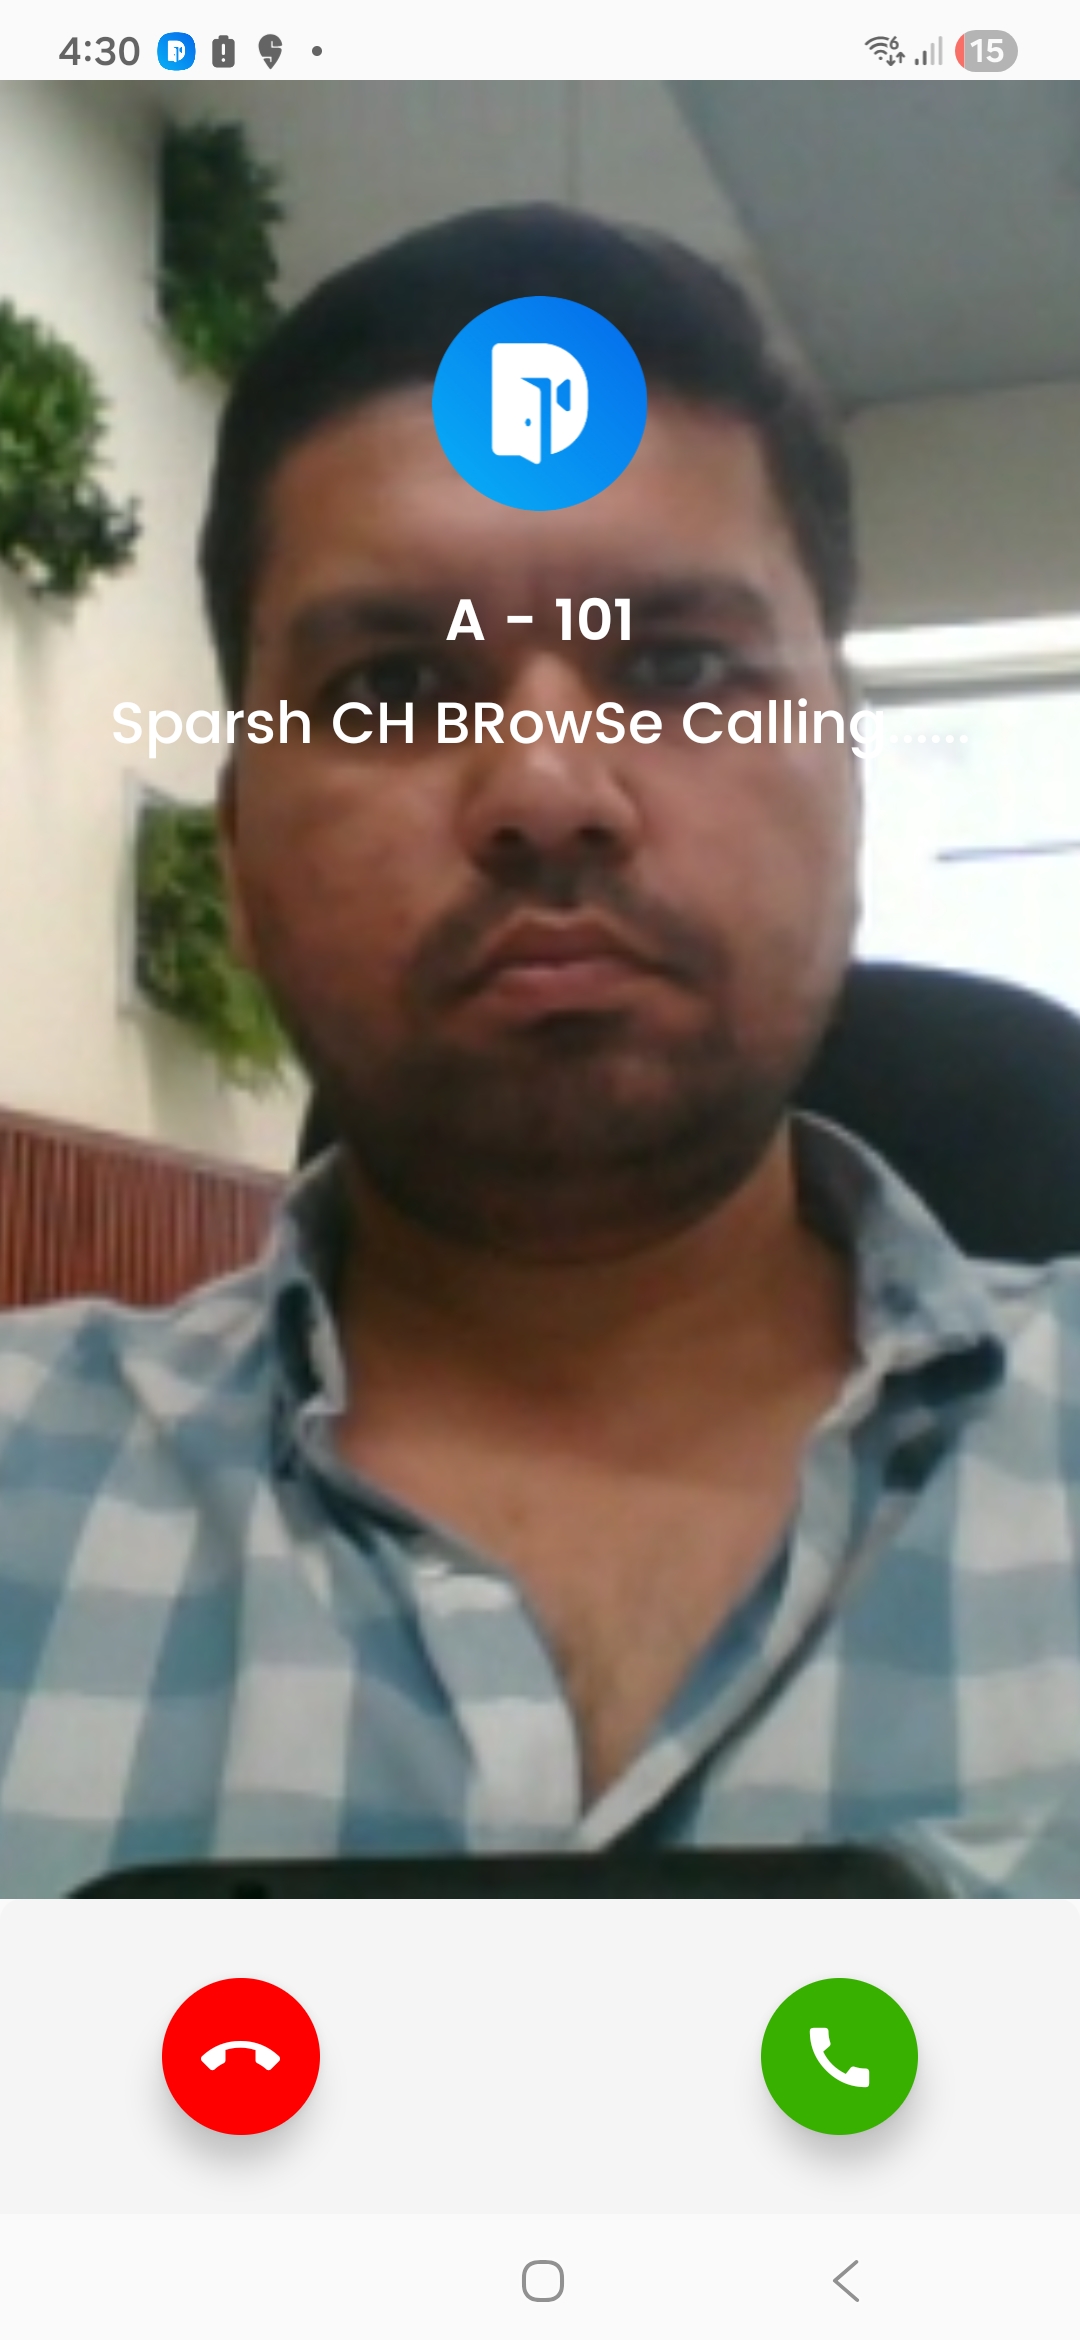
The invited member can now receive and respond to visitor calls from their own device.
Each family member gets full call access. When a visitor rings your doorbell, all linked devices ring at the same time — whoever answers first handles the call.
Screenshot — Member Added Confirmation
Need help? Contact your property manager or reach the DoorVi support team at Contact Us or email media@doorvi.co.
Visitor Video Calls
Receive and respond to visitor calls directly from your smartphone
Accept Calls
When a visitor rings the DoorVi doorbell at your building entrance, you will instantly receive a video call on your phone
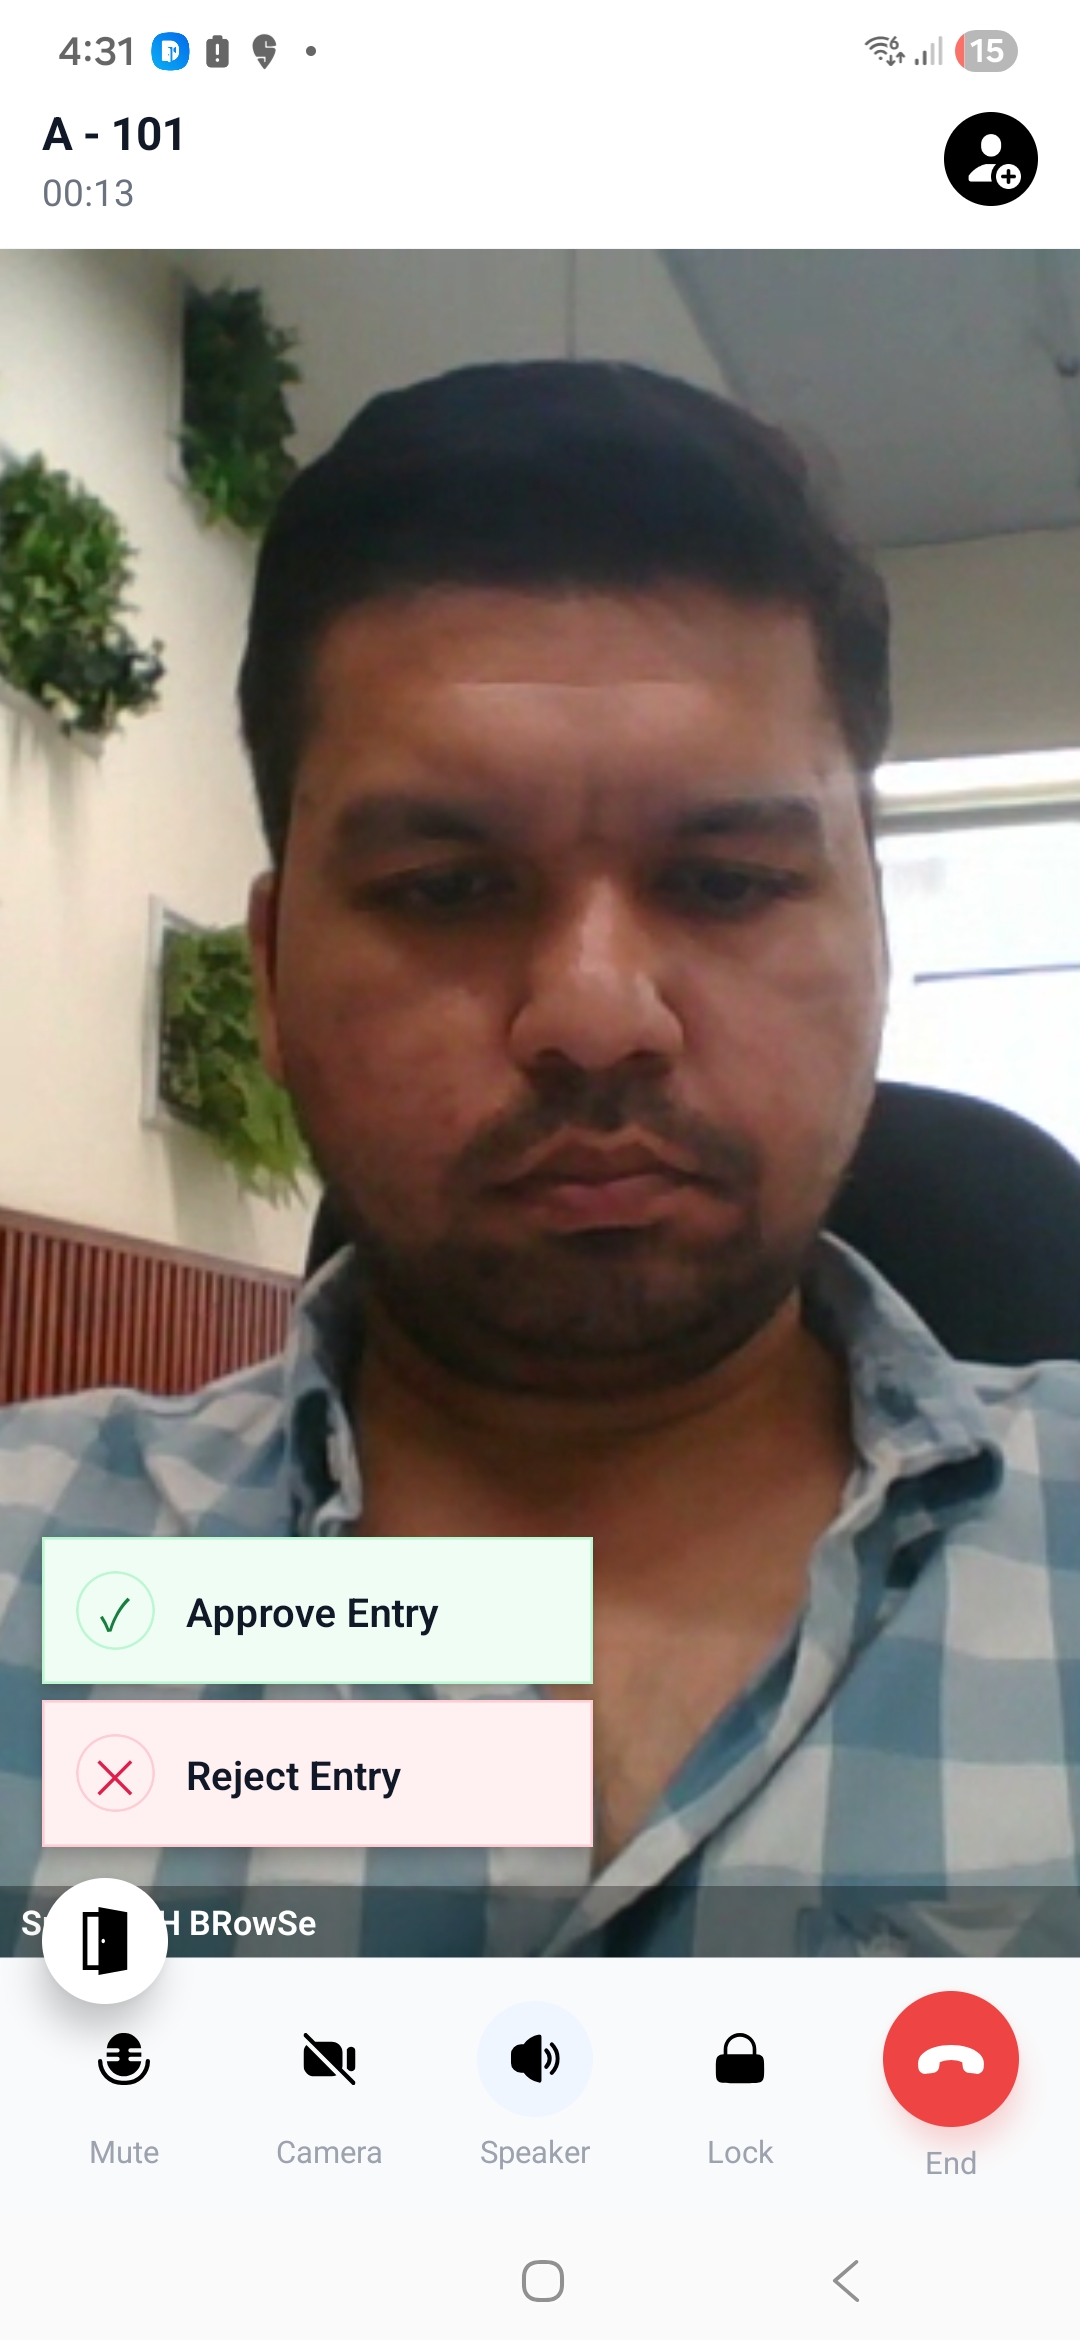
1
When a visitor rings the DoorVi doorbell, your phone receives an incoming call notification.
2
The call screen shows your apartment number and the visitor's name or browser identifier.
3
You can see the visitor live through the video feed on the call screen before answering.
4
Tap the green button to accept the call and speak with your visitor.
5
Tap the red button to decline the call if you do not wish to let the visitor in.
Incoming Call
Approve / Reject Visitor Entry
Once on the call, grant or deny access to your visitor with a single tap
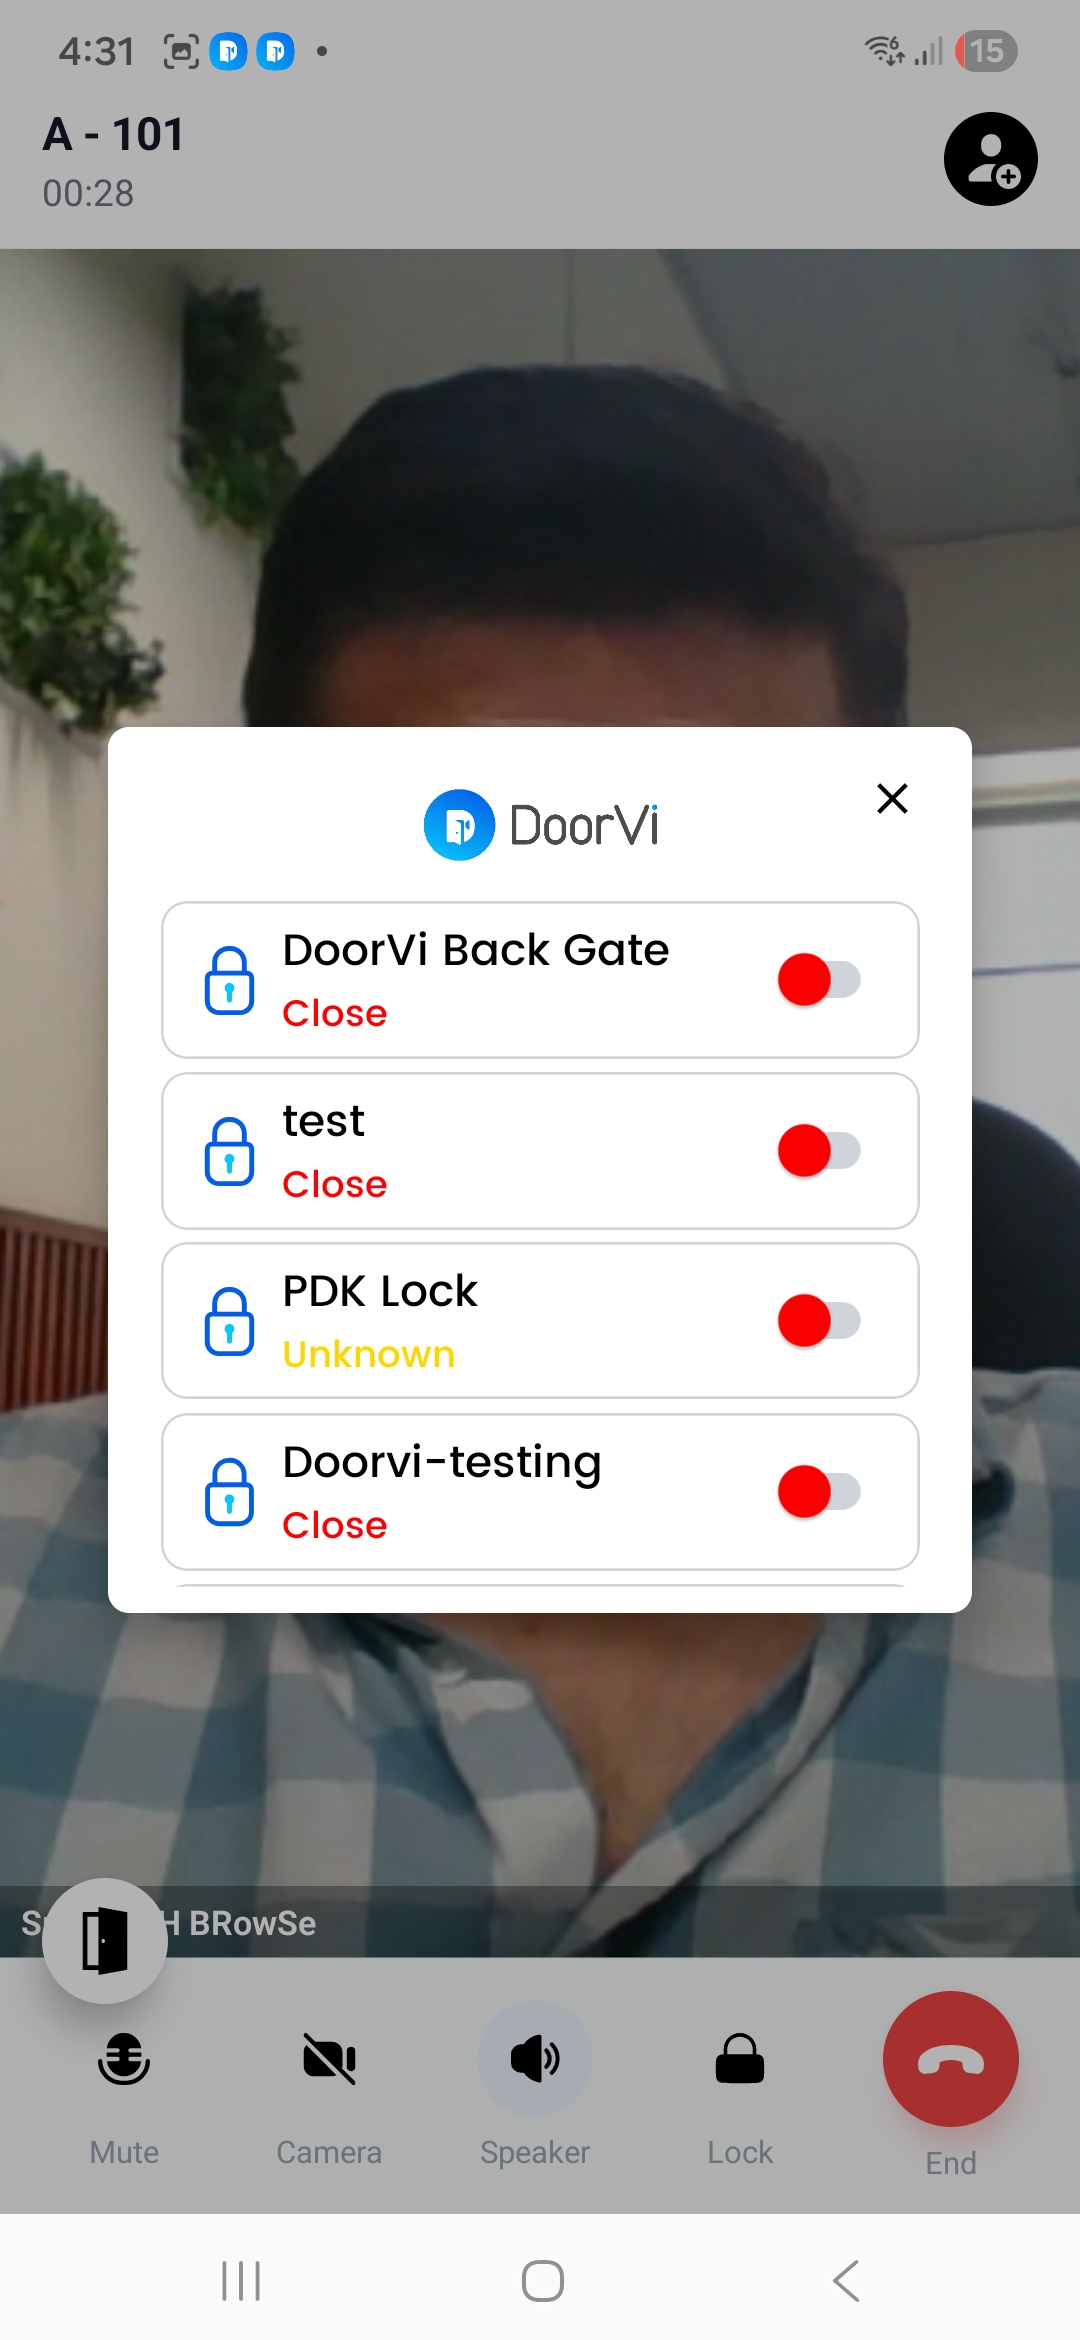
1
After accepting the call, the live video feed of the visitor appears on your screen.
2
Your apartment number and the call duration are shown at the top of the screen.
3
Tap the Door icon in the bottom left — two action buttons will appear: Approve Entry (green) and Reject Entry (red).
4
Tap Approve Entry to unlock the door and grant access to your visitor.
5
Tap Reject Entry to deny access and keep the door locked.
6
Use the bottom controls to Mute, toggle Camera, switch to Speaker, activate Lock, or End the call.
Active Call
Unlock Gate & Allow Access
Remotely open a specific gate or door for your visitor directly from the call screen
1
During the call, tap the Lock button in the bottom controls.
2
A popup appears showing all gates and locks connected to your building.
3
Each entry shows the gate name and its current status — Close (locked) or Unknown.
4
Tap the toggle next to the gate you want to unlock to grant your visitor access.
5
Tap × to close the popup and return to the live call.
Gate Selection
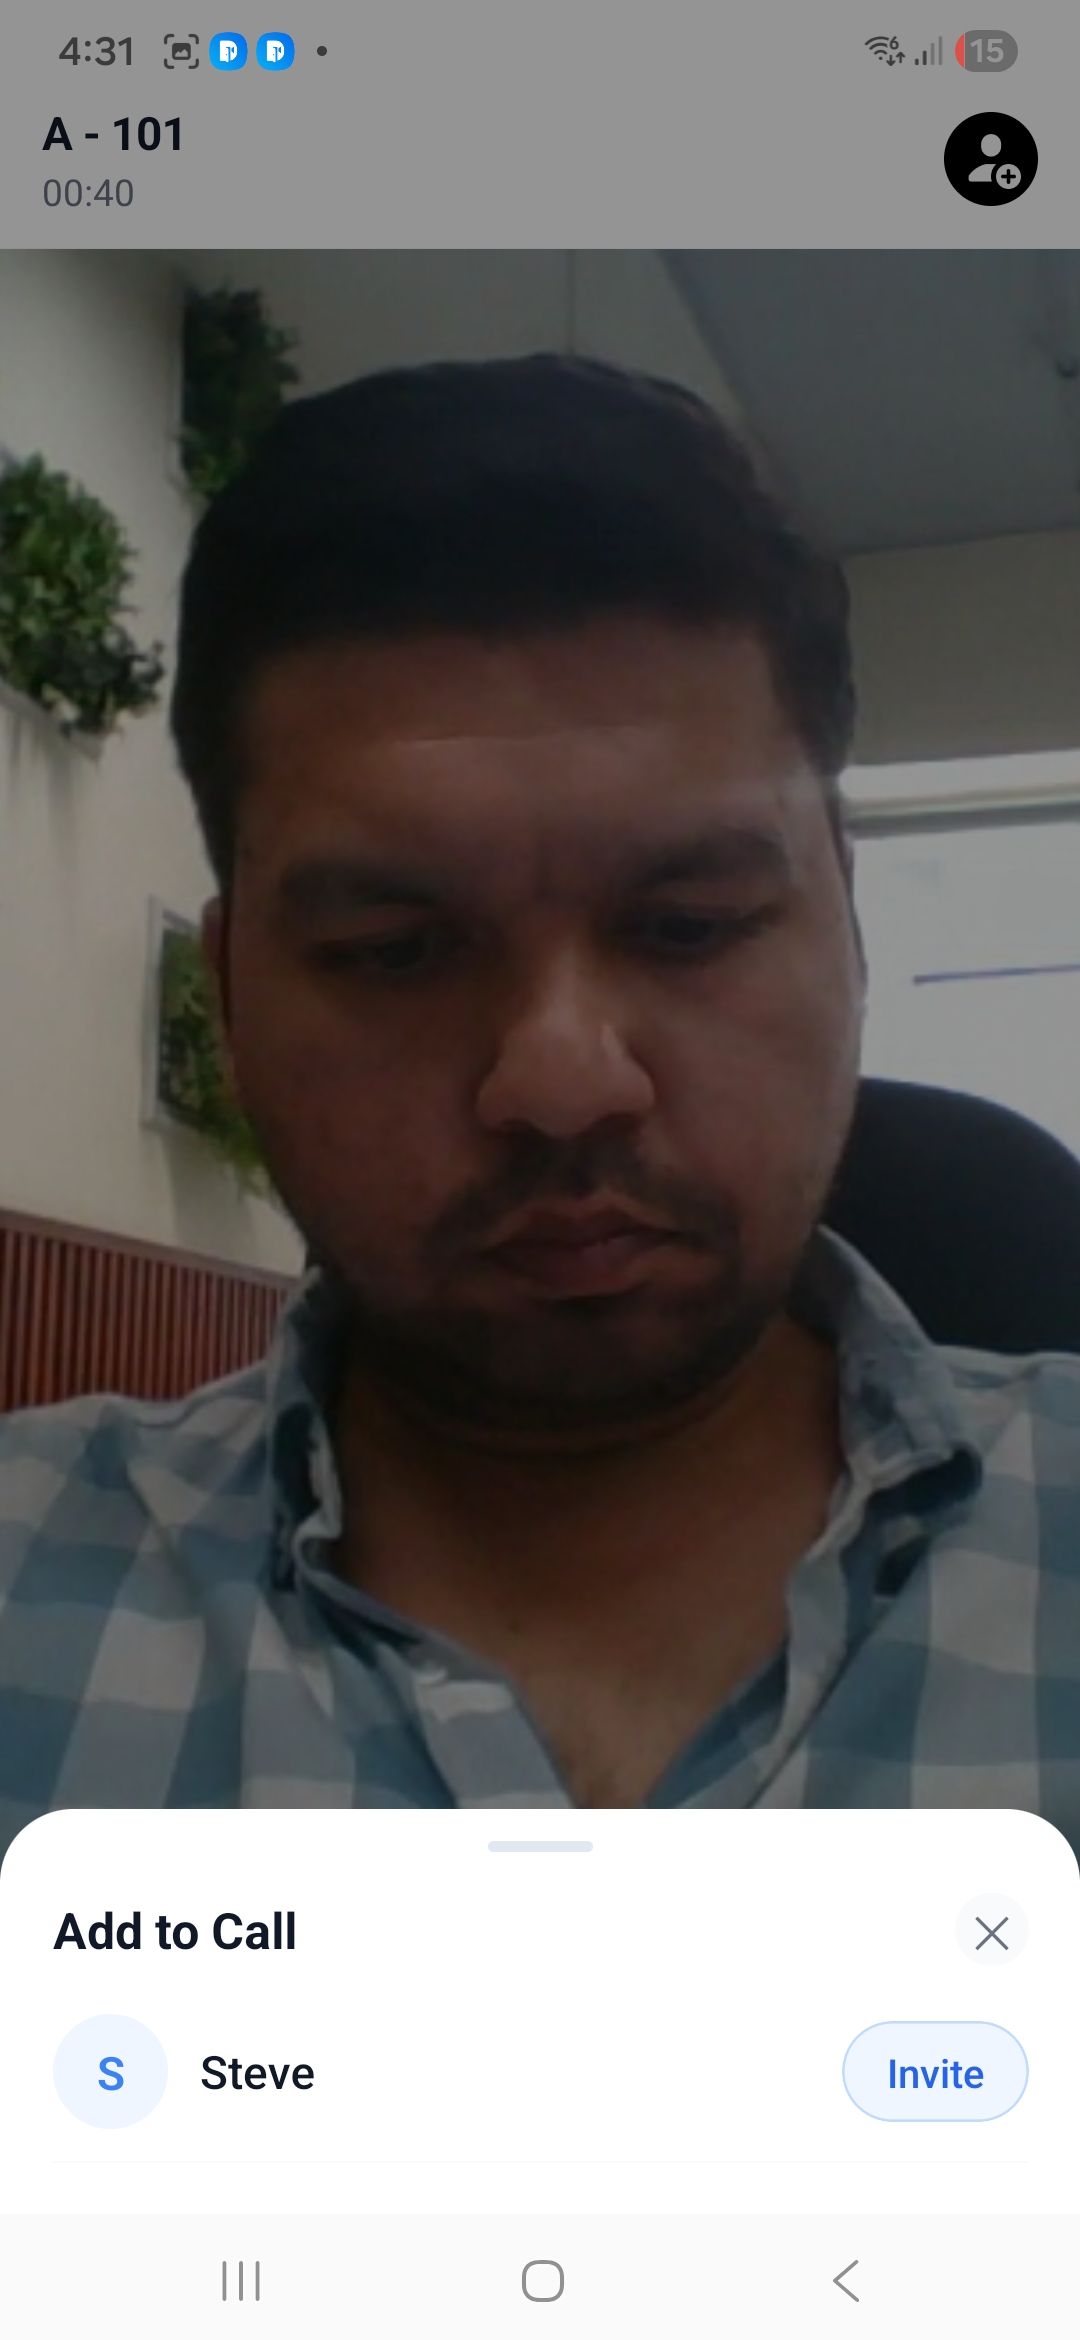
Add Member During Call
Invite a family member to join an ongoing visitor call directly from the call screen
1
During an active call, tap the Add Member icon (person with +) in the top right corner of the screen.
2
An "Add to Call" panel slides up from the bottom, showing a list of your registered family members.
3
Find the member you want to join the call and tap Invite next to their name.
4
The invited member receives an incoming call notification on their device and can join the conversation.
5
Tap × to close the panel and return to the live call.
Add to Call
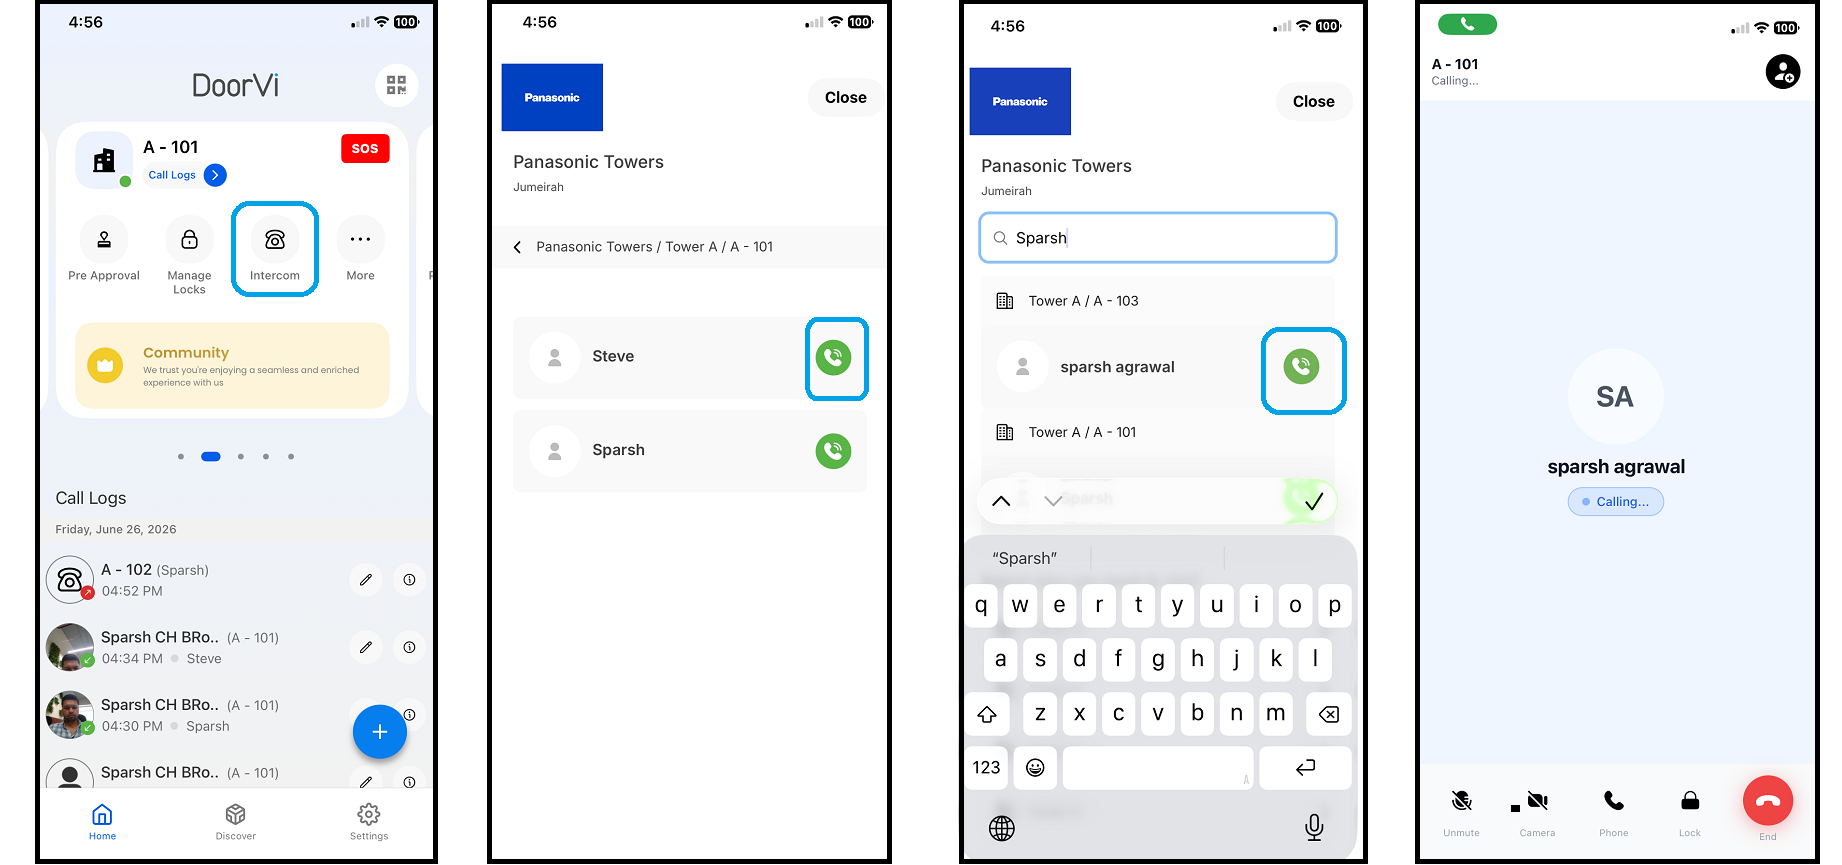
Apartment Calling Apartment
Call any resident in your building directly from the DoorVi app
Make an Intercom Call to Another Apartment
Use the built-in intercom to call any apartment in your building with a single tap
1
On the home screen of the DoorVi app, tap the Intercom icon on the card.
2
A list of all apartments in your building will appear.
3
Select the apartment you want to call.
4
You can also search for a resident by name using the search bar.
5
Tap the green call icon to initiate an audio call.
6
The call will be connected and the resident will receive an audio call on their device.
Screenshot — Apartment Intercom Call Screen
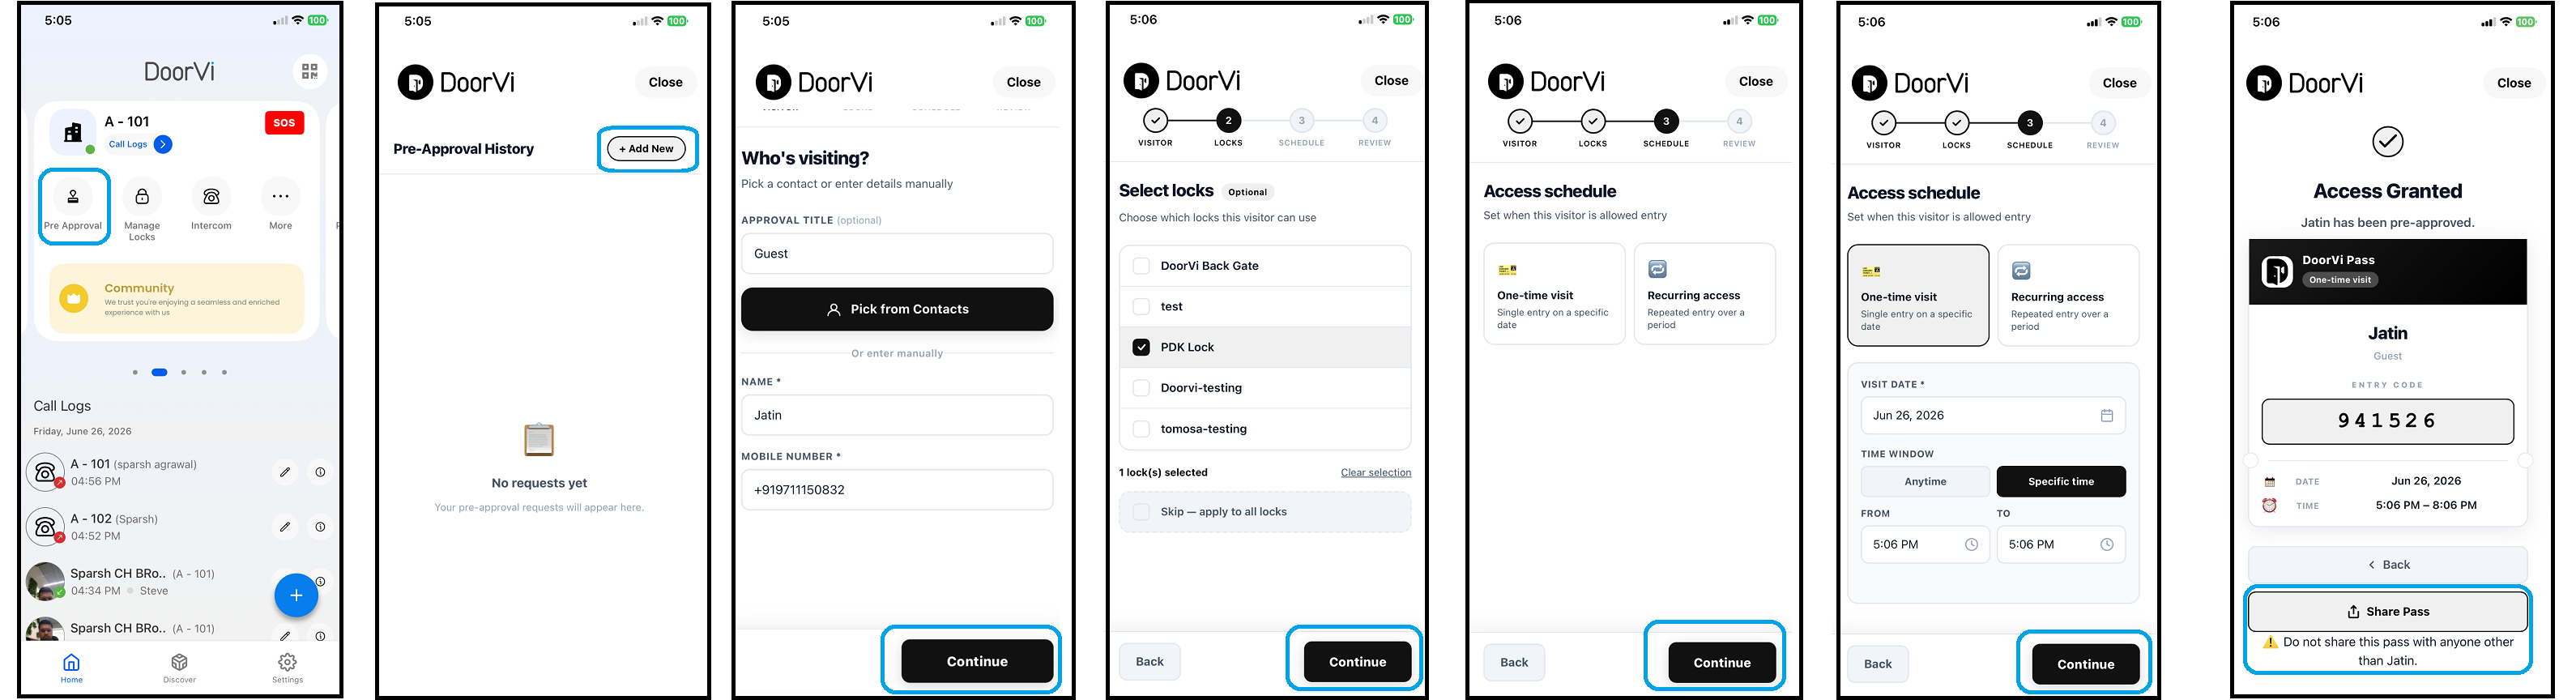
Pre-Approved Guest Access
Create entry passes for expected guests so they can enter without a call
How Pre-Approved Guest Access Works
Generate a unique 6-digit pass for your guest before they arrive — no doorbell call needed at the gate
Pre-approvals are the fastest entry flow — ideal for guests, deliveries, and domestic help. Your guest receives a 6-digit code and can enter automatically at the gate without needing to call you.
1
On the home screen of the DoorVi app, tap the Pre-Approval button.
2
Tap Add New to create a new pass.
3
Enter your guest's name and phone number, or import directly from your contact list.
4
Select the lock you want your guest to access upon arrival.
5
Select the pass type that best matches your guest's visit (see Pass Types below).
6
Set the valid date or time range for their entry.
7
Review the details and tap Grant Access — a unique 6-digit invite code will be created.
8
Share the code with your guest via WhatsApp, SMS, or any messaging app.
9
Your guest presents the code at the gate — entry is granted automatically, no call required.
Screenshot — Pre-Approved Guest Access Screen
Pass Types
Choose the right pass type depending on how often and how long your guest needs access
| Pass Type | Valid For | Best For |
|---|---|---|
| Single-use | One entry, one day | Delivery, one-time guest |
| Multi-use (date range) | Unlimited entries in a date window | House guests staying a few days |
| Recurring | Specific days of the week | Maid, driver, cook |
| Event pass | Multiple guests, one time window | Birthday party, building event |
Your property manager must enable Pre-Approval in the admin settings before this feature appears in your app. Contact your building admin if you do not see the Pre-Approval button.